Showing posts with label capo. Show all posts

Saturday, December 1, 2018

Shimming tutorial (sort of)


Greetings, folks. I would like to begin December with this sharing because it's something you can DIY at home without bringing it to a tech & getting charged for it. This is a simple shimming exercise using materials/ tools which a non-tech can handle. To begin with, the shim material I'm using is a left over package inlay from a Seyour Duncan pot. The reason for using it- it's a thin material & chances are, you can double/ triple ply it to suit your needs as opposed to starting with a thick material & facing problems of subtraction to make the material thinner.


If you intend to keep the current strings while shimming takes place, use a capo to secure loose strings before removing the neck from the body. Of course, detune your strings first. 


Cut out the shim to shape as depicted above. In this instance, I'm using a double ply. What you see there is a piece which had been folded into 2 parts. Make sure the shim material does not move once neck re-attachment takes place. If it does, hold it down with a weenie bit of paper glue. Leave it to dry before returning the neck to where it belongs.
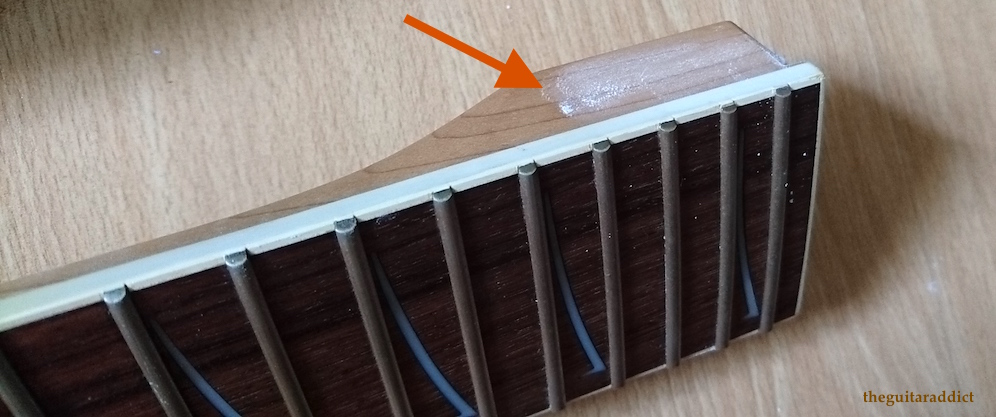

It is my personal habit to powder the sides of the neck so that re-attachment is smooth.


After re-attachment, this is what you should look out for- a leveraged neck end. Please observe slight increments in height. More importantly, your strings should be parallel to the fretboard (I've included the strings here for a clearer reference). 


Alright! Good to go! Why is shimming required?
  • The inner cavity of the body's neck pocket might be routed a little too deep. Factory hands won't flag this as an anomaly unless the depth is excessive.
  • When you tighten the neck screws, softer body wood would compress & this is especially true if wood is not throughly dried before manufacturing takes place
  • You switched to a thicker string gauge set & increased the tension of the neck. This tension causes a further downward pressure at the cavity end & guitar necks would sink in after some time. This is again compounded by the body's soft wood material/ lack of proper drying.
Wishing everyone a good December ahead. Year end mood is kicking in. Slowly but surely. 😎

Monday, June 19, 2017

Price watch (7)


Got this alert from a friend yesterday (you know who you are- thanks for stopping by); the Planet Waves NS Classical Guitar Capo is sporting 2 prices at the stores here: $21.90 vs $17.00 but some of us would deem this acceptable. Stores have their respective pricing formula, we are not privy to any of them. We are at the receiving end.

The rest of us would consider this unacceptable. The fact that one store can offer this item at a lower price implies that the other is trying to maximize profits at the consumers' expense. Yes, any business entity would need to maximize profit, otherwise, it's not staying true to its commercial nature. However, is there a cut off point where any excess would deem the entity unethical? 

If you've been keeping up with the news lately (you can read it here: CLICK), there is now a watchdog monitoring the explosive formula milk prices. The message is clear, if things go out of hand, something will happen. While we respect the stores for pricing their wares as they deem fit, we'd like them to know that they should be more pro-active in revising their prices once an alternative reference is made known or a pressing issue is put forth. They have no obligations to comply, of course, as much as we have no obligations to buy from them. 

Thursday, April 8, 2010

Guitar set up: Simple instructions (maybe) Part 2

You will then proceed to tune your guitar. This way, your set-up & anomaly assessments are based on the instrument in standard tuning. Remove the truss rod cover.

Employ your capo on the first fret while fretting the instrument at its final, uppermost fret. Now observe the gap between the string & the fret crown at the 12th, 8th & 7th frets by pressing the strings down lightly at those areas. Do this for all strings. The objective here is to check the neck's straightness. If the gap between the strings & the fret crown is too much, it means your neck's relief (how concave, the shape of your neck is) is correspondingly too much. If your strings come into contact with all the frets when you are doing this, it means you have a straight guitar neck, which is the best condition to be working with. Remember, a very straight neck is not the most appealing.

...to be continued.
-------------------------------------

Startled from sleep.

Wednesday, April 7, 2010

Guitar set up: Simple instructions (maybe) PART 1

I do my own guitar set up because I want to; I believe it's nothing the owner cannot execute. It also helps me understand my guitar better, making it manifest how I want it to be. A guitar set up is necessary when the instrument's playability is affected by temperature changes due to shipping storage & in-store display (reaction to air-conditioning). The guitar being set up here is my Ibanez GRGR010LTD, the tools used, as documented above are:

  1. Cross tip screw driver
  2. Allen wrench
  3. Metal ruler
  4. Capo
  5. Guitar cable
  6. Tuner
... to be cont'd.

Saturday, December 20, 2008

I do truss rod adjustments myself, it's not that complicated but it's an exercise in due care; excessive adjustments could lead to irreversible neck damage.

For those of us who do neck adjustments ourselves, here's a tip: How do you determine, other than resorting to the use of capo at the first fret & pressing the 14th fret of your guitar while checking relief, your neck has straightened/ moved after turning the wrench? You use a tuner.

Before you turn that wrench, make sure your guitar is in tune. Proceed to tighten/ loosen the neck accordingly (depending on the relief issue of your guitar's neck). Wait a little while (5min or so) & re-check your tuning- it should be a little flat/ sharp, indicating the occurrence of neck movements. If your tuner fails to register any changes, it would mean the truss rod is not in working order so stop any neck rectifications immediately.